
In this mod tutorial, we will cover the basics of customizing and working with the game's user interface. This tutorial assumes you have completed the Getting Started tutorial and you are familiar with the basics of creating mods in Juno: New Origins. This tutorial was last updated with version 1.0.9 and Unity 2021.3.19f1.
In this tutorial, we will first add a custom button to the designer UI. We will then make this custom button open a custom UI window. On this custom UI window, we will create a button that opens a simple message box dialog. The dialog will display a message depending on the dialog option chosen. None of this will do anything useful, but it should help demonstrate the basic concepts of modifying and creating user interfaces in JNO.
Getting Started
First we create a new mod project. We will name this mod "UI Basics Tutorial". See the Getting Started tutorial for more info on this. Next, import the UI Basics Tutorial Assets unitypackage into the project. This contains the sprite assets needed to complete this tutorial. At this point, the mod should be in a state that it can be built and loaded into the game, even though it does nothing yet.
XmlLayout
JNO uses an asset called XmlLayout. It is used for creating user interfaces from XML. If you intend to do work with user interfaces in JNO, it is highly recommended that you read the XmlLayout documentation and familiarize yourself with how it works.
XmlLayout Documentation
http://www.digital-legacy.co.za/XmlLayout/Documentation
Stock UI Files
During the import of the mod tools unity package, XML files for all the game's stock user interfaces should be imported. These are located here: "\Assets\ModTools\UI\Xml". These files are for reference only and should not be modified. These can be used to see how the game's user interfaces were built as well as being useful as a reference when trying to modify the stock user interfaces via code (which we will do soon).
In addition to the user interface XML files, there should also be a file imported at "\Assets\ModTools\UI\StockUserInterfaceResourcesManifest.txt". This file contains a list of all the files included in the game's UI resource database. These file paths can be used to reference stock resources in custom built user interfaces. For instance, if we were to build a custom UI with XML, we could include some images from the stock game in this new UI by referencing the image by the path shown in this manifest file.
UI Sprite Assets
After importing the UI Basics Tutorial Assets unitypackage, we should have 2 textures ("TutorialGear.png" and "TutorialDialog.png") imported at "\Assets\Content\XML UI\Sprites". Select both of these textures. In the inspector window, we need to set the texture type to "Sprite (2D and UI)". The rest of the settings should be fine. Be sure to click the apply button.
![]()
Next, we need to verify that these sprites have been added to the XmlLayout resource database. If not, then they will not be usable by XmlLayout. Select the resource database at "\Assets\Content\XML UI\UIResourceDatabase". Expand the entries in the inspector window and verify that both "TutorialGear" and "TutorialDialog" both show up. The path shown in the inspector window for each UI resource database entry is the path used in XML files to reference that sprite. The path is based off the mod name. If your mod is named "UI Basics Tutorial", then the paths to each image should be "UI Basics Tutorial/Sprites/TutorialGear" and "UI Basics Tutorial/Sprites/TutorialDialog".
![]()
Adding a Designer Button
Now we are going to start working on adding a button to the button panel on the left side of the screen in the designer. Create a new C# file here: "\Assets\Scripts\Ui\Designer\TutorialDesignerButton.cs". In this new file, create a static class named "TutorialDesignerButton" and then create a "static void Initialize()" method.
public static class TutorialDesignerButton
{
    public static void Initialize()
    {
    }
}
We need to call our initialize method when the mod is loaded. Open up "\Assets\Scripts\Mod.cs" and override the "OnModInitialized" method. Call our "TutorialDesignerButton.Initialize()" method from here.
namespace Assets.Scripts
{
    using System;
    using System.Collections.Generic;
    using System.Linq;
    using System.Text;
    using Assets.Scripts.Ui.Designer;
    using ModApi;
    using ModApi.Common;
    using ModApi.Mods;
    using UnityEngine;

    /// <summary>
    /// A singleton object representing this mod that is instantiated and initialize when the mod is loaded.
    /// </summary>
    public class Mod : ModApi.Mods.GameMod
    {
        /// <summary>
        /// Prevents a default instance of the <see cref="Mod"/> class from being created.
        /// </summary>
        private Mod() : base()
        {
        }

        /// <summary>
        /// Gets the singleton instance of the mod object.
        /// </summary>
        /// <value>The singleton instance of the mod object.</value>
        public static Mod Instance { get; } = GetModInstance<Mod>();

        /// <summary>
        /// Called when the mod is initialized.
        /// </summary>
        protected override void OnModInitialized()
        {
            base.OnModInitialized();

            TutorialDesignerButton.Initialize();
        }
    }
}
Lets go back to our TutorialDesignerButton class and implement that initialize method. First we should add a few using statements at the top of the file.
using System.Xml.Linq;
using ModApi.Common;
using ModApi.Ui;
Next, in the initialize method, we get a reference to the Game's user interface class. This contains many utility methods for working with the game's UI related features. We use this user interface class to register an action that fires whenever a user interface with a particular ID is being built. The ID we care about in this case is "UserInterfaceIds.Design.DesignerUi". The callback that fires provides a "BuildUserInterfaceXmlRequest" object.
public static void Initialize()
{
    var userInterface = Game.Instance.UserInterface;
    userInterface.AddBuildUserInterfaceXmlAction(
        UserInterfaceIds.Design.DesignerUi,
        OnBuildDesignerUI);
}

private static void OnBuildDesignerUI(BuildUserInterfaceXmlRequest request)
{
}
Whenever the designer UI is built, we want to add our button to the button panel on the left. First, lets take a look at the designer UI XML at "Assets/ModTools/Design/DesignerUi.xml". We want to add our button after the view button and we want it styled so it fits in and looks similar to the others.
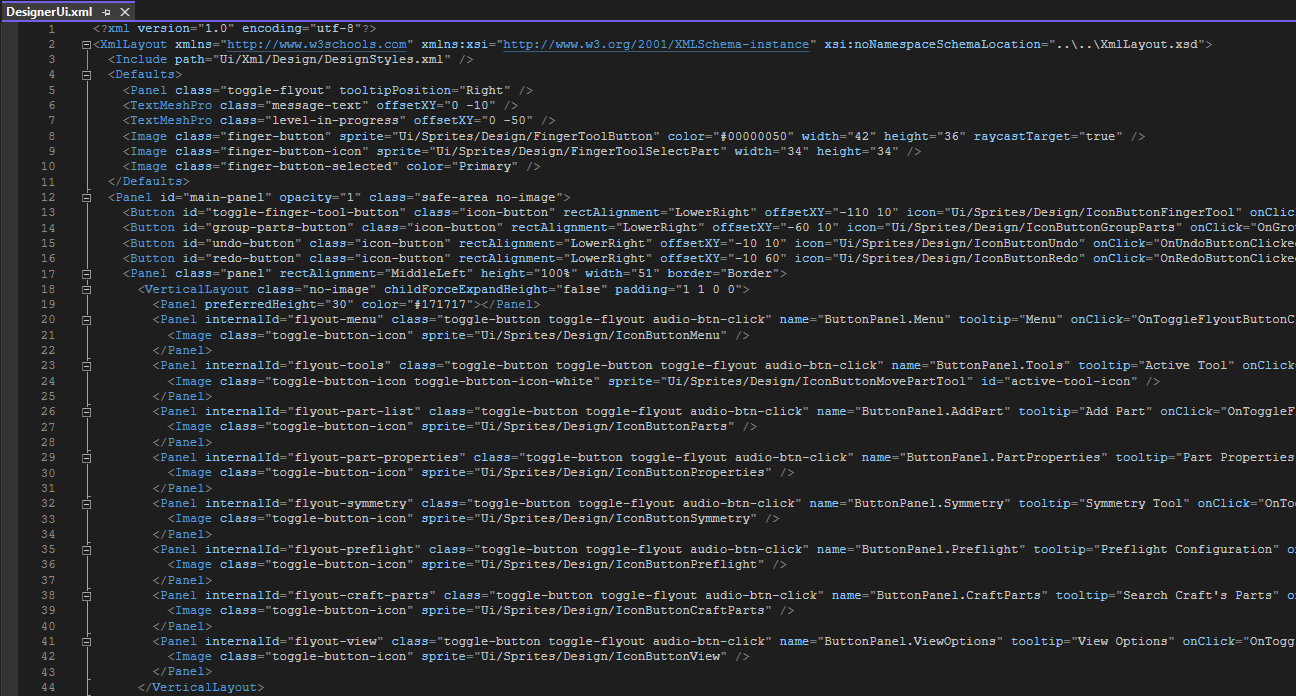
Our new button will need a unique id, so lets create a constant for it now.
private const string _buttonId = "tutorial-designer-button";Lets implement our callback method that fires when the designer UI is built. The "BuildUserInterfaceXmlRequest" object has a "XmlDocument" property that we can use to retrieve the XML that defines the user interface. We will modify the XML in this callback and the modified XML will then be used to create the UI. First thing we want to do is find the XML element responsible for the "View Options" button. The XML uses a namespace, so we must be mindful of this when querying and modifying the XML.
var ns = XmlLayoutConstants.XmlNamespace;
var viewButton = request.XmlDocument
    .Descendants(ns + "Panel")
    .First(x => (string)x.Attribute("internalId") == "flyout-view");
Now that we have found the view button, we can add another button element to the view button's parent element. Create the button using the following code snippet. Note that we reference our "TutorialGear" sprite that we imported at the beginning of our project for the button image.
viewButton.Parent.Add(
new XElement(
ns + "Panel",
new XAttribute("id", _buttonId),
new XAttribute("class", "toggle-button audio-btn-click"),
new XAttribute("name", "ButtonPanel.TutorialDesignerButton"),
new XAttribute("tooltip", "A button created for a modding tutorial."),
new XElement(
ns + "Image",
new XAttribute("class", "toggle-button-icon"),
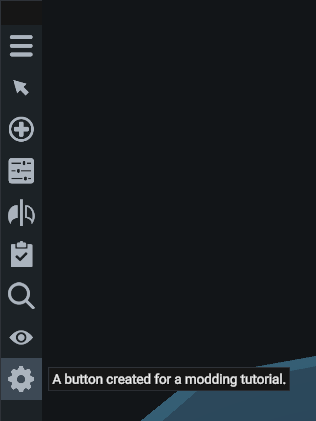
new XAttribute("sprite", "UI Basics Tutorial/Sprites/TutorialGear"))));At this point, our button should show up. Lets save the mod, load the game, enable the mod, and jump into the designer. We should be able to see our new button, but it doesn't do anything yet.
Adding a Click Event
Next, we need to wire up our button to actually do something when it is clicked. Later, we are going to make this button open a user interface window defined with custom XML, but for now, we are just going to show a message in the designer when it is clicked. We can define an "onClick" attribute in the XML for our button, but the problem is that the event receiver is the XmlLayoutController for the designer UI, which is part of the stock game code.
Our mod code needs to be notified when the button is clicked. First we need to subscribe to the layout rebuilt event for the designer UI. When the layout is rebuilt, we can find the button that we added via its unique ID, and then we can add the click event for the button via code rather than XML.
Lets revisit our "OnBuildDesignerUI" method of our "TutorialDesignerButton" class. At the end of this callback method, we are going to subscribe to the layout rebuilt event. We can do this via the "AddOnLayoutRebuiltAction" method on the "BuildUserInterfaceXmlRequest" object. We use XmlLayout to get the button XmlElement by its ID, then we add the on click event to the button.
request.AddOnLayoutRebuiltAction(xmlLayoutController =>
{
    var button = xmlLayoutController.XmlLayout.GetElementById(_buttonId);
    button.AddOnClickEvent(OnButtonClicked);
});
For now, our "OnButtonClicked" event will just simply show a designer message when clicked. Implement the method and make a call to "Game.Instance.Designer.DesignerUi.ShowMessage".
private static void OnButtonClicked()
{
    Game.Instance.Designer.DesignerUi.ShowMessage("Designer Tutorial Button Clicked", 3f);
}
We can now save the mod and test it out. It should work like before only now it shows a designer message (top-center of screen) when the button is clicked.
Creating a Custom UI
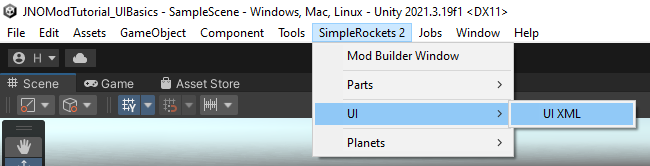
Now we are going to start creating our custom UI to be shown whenever the user clicks the designer button. First, we need to create a UI XML file. We can do this by going to the "SimpleRockets 2" menu item, selecting "UI", then selecting "UI XML". Name the file "TutorialDialog.xml" and save it here: "\Assets\Content\XML UI\Designer\TutorialDialogUI.xml".
Open up our new XML file and lets create some content. If you are using Visual Studio to edit the file, it should support auto-complete and intellisense because the XML is linked to an XML schema file. First, lets start by including the XmlLayout UI styles for the designer scene. You can look at the content of the styles xml here: "\Assets\ModTools\UI\Xml\Design\DesignStyles.xml" which also includes the styles here: "\Assets\ModTools\UI\Xml\Styles.xml".
<Include path="Ui/Xml/Design/DesignStyles.xml" />Now lets create a panel used for the dialog window. This panel will have a class of "panel" which references a style defined in one of the styles XML documents. We limit the panel size and allow it to be dragged.
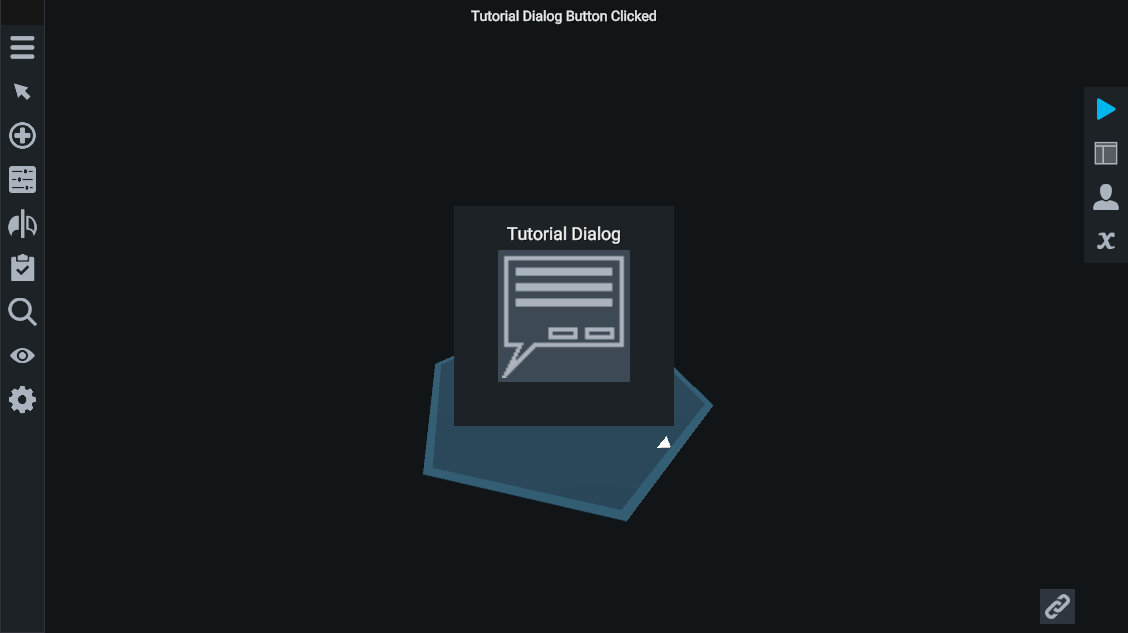
<Panel class="panel" width="250" height="250" allowDragging="true" returnToOriginalPositionWhenReleased="false">Inside this panel we will create a TextMeshPro element to display the dialog header.
<TextMeshPro text="Tutorial Dialog" alignment="Top" offsetMax="0,-20" fontSize="20" />Finally, we will create a sprite button. This has a class of "icon-button" which is also a style class defined by the JNO styles XML. We set the icon to our dialog icon we set up earlier in the tutorial, using the path shown in the resource database: "UI Basics Tutorial/Sprites/TutorialDialog". Finally, we add an "onClick" handler. This will not function yet, but we will wire it up soon.
<Button class="icon-button" width="150" height="150" icon="UI Basics Tutorial/Sprites/TutorialDialog" onClick="OnDialogButtonClicked" />The full content of our custom UI should look like the XML below.
<XmlLayout xmlns="http://www.w3schools.com" xmlns:xsi="http://www.w3.org/2001/XMLSchema-instance" xsi:noNamespaceSchemaLocation="..\..\..\ModTools\UI\XmlLayout.xsd">
  <Include path="Ui/Xml/Design/DesignStyles.xml" />
  <Panel class="panel" width="250" height="250" allowDragging="true" returnToOriginalPositionWhenReleased="false">
    <TextMeshPro text="Tutorial Dialog" alignment="Top" offsetMax="0,-20" fontSize="20" />
    <Button class="icon-button" width="150" height="150" icon="UI Basics Tutorial/Sprites/TutorialDialog" onClick="OnDialogButtonClicked" />
  </Panel>
</XmlLayout>
Finally, we need to create a script that is responsible for this UI. This new script will be the one receiving the click event we specified on our dialog button. Create a new script here: "\Assets\Scripts\Ui\Designer\TutorialDialogScript.cs". Make this new script inherit from MonoBehaviour. Add a method for the button click event we setup in the last step and for now, just have it show a designer message.
namespace Assets.Scripts.Ui.Designer
{
    using System;
    using System.Collections.Generic;
    using System.Linq;
    using System.Text;
    using System.Threading.Tasks;
    using ModApi.Common;
    using UnityEngine;

    public class TutorialDialogScript : MonoBehaviour
    {
        private void OnDialogButtonClicked()
        {
            Game.Instance.Designer.DesignerUi.ShowMessage("Tutorial Dialog Button Clicked", 3f);
        }
    }
}
Loading the Custom UI
Now that we have a custom UI window created, we need to display it. We will do so when the user clicks our designer button we created in the first part of the tutorial.
We need to make a couple additions to our "TutorialDialogScript". First, will need to keep track of the XmlLayoutController used by this UI. Create a field for tracking this.
private IXmlLayoutController _controller;Now we need to create a public method that is called whenever the UI is rebuilt. This method needs to take an IXmlLayoutController parameter. We will call it "OnLayoutRebuilt". More complicated dialogs may use this XmlLayoutController (and its XmlLayout property) to grab references to UI elements and do stuff like update/modify/track them, but for our simple dialog, we only need to save this parameter with the field we created earlier.
public void OnLayoutRebuilt(IXmlLayoutController xmlLayoutController)
{
    this._controller = xmlLayoutController;
}
The last thing we need to do with our "TutorialDialogScript" is add a public method for closing the dialog. We use our XmlLayoutController reference that we saved in the "OnLayoutRebuilt" method to hide the UI object. In the "onCompleted" callback of "Hide" we destroy the root game object of the UI.
public void Close()
{
    this._controller.XmlLayout.Hide(() => GameObject.Destroy(this.gameObject), true);
}
Now lets revisit our "TutorialDesignerButton" class. First, we need to create a static reference to our "TutorialDialogScript" so we can track if it has been opened and close it if needed. Create this new field to store the reference.
private static TutorialDialogScript _dialogScript;Now head back to our "OnButtonClicked" method of the "TutorialDesignerButton" class and remove the designer message we added previously. If the "TutorialDialogScript" reference is not null, we want to close the dialog, otherwise we create the dialog. Creating the dialog can be done by calling the "BuildUserInterfaceFromResource" method on the "UserInterface" class. This will build the user interface and return the specified script which has been attached to the root game object of the new interface (which we will track). There are various overloads for this method (and similarly named methods) depending on what you are needing to do. For this tutorial, we will specify the script associated with this UI and the path to the XML file (from the resource database). We also need to make sure our "OnLayoutRebuilt" method that we created earlier gets called when the layout is rebuilt. .
private static void OnButtonClicked()
{
    if (_dialogScript != null)
    {
        _dialogScript.Close();
        _dialogScript = null;
    }
    else
    {
        var ui = Game.Instance.UserInterface;
        _dialogScript = ui.BuildUserInterfaceFromResource<TutorialDialogScript>(
            "UI Basics Tutorial/Designer/TutorialDialogUI",
            (script, controller) => script.OnLayoutRebuilt(controller));
    }
}
There is one important final thing we need to do before we test this. We need to make sure we are not creating a memory leak with the static reference to the designer script. In our "Initialize" method, lets subscribe to the "SceneTransitionStarted" event and null out the "TutorialDialogScript" reference so it doesn't leak memory into the next scene if it is open when a transition occurs.
Game.Instance.SceneManager.SceneTransitionStarted += (s, e) => _dialogScript = null;Our scripts should now look like this:
namespace Assets.Scripts.Ui.Designer
{
    using System;
    using System.Collections.Generic;
    using System.Linq;
    using System.Text;
    using System.Threading.Tasks;
    using System.Xml.Linq;
    using ModApi.Common;
    using ModApi.Ui;

    public static class TutorialDesignerButton
    {
        private const string _buttonId = "tutorial-designer-button";

        private static TutorialDialogScript _dialogScript;

        public static void Initialize()
        {
            var userInterface = Game.Instance.UserInterface;
            userInterface.AddBuildUserInterfaceXmlAction(
                UserInterfaceIds.Design.DesignerUi,
                OnBuildDesignerUI);

            Game.Instance.SceneManager.SceneTransitionStarted += (s, e) => _dialogScript = null;
        }

        private static void OnBuildDesignerUI(BuildUserInterfaceXmlRequest request)
        {
            var ns = XmlLayoutConstants.XmlNamespace;
            var viewButton = request.XmlDocument
                .Descendants(ns + "Panel")
                .First(x => (string)x.Attribute("internalId") == "flyout-view");

            viewButton.Parent.Add(
                new XElement(
                    ns + "Panel",
                    new XAttribute("id", _buttonId),
                    new XAttribute("class", "toggle-button audio-btn-click"),
                    new XAttribute("name", "ButtonPanel.TutorialDesignerButton"),
                    new XAttribute("tooltip", "A button created for a modding tutorial."),
                    new XElement(
                        ns + "Image",
                        new XAttribute("class", "toggle-button-icon"),
                        new XAttribute("sprite", "UI Basics Tutorial/Sprites/TutorialGear"))));

            request.AddOnLayoutRebuiltAction(xmlLayoutController =>
            {
                var button = xmlLayoutController.XmlLayout.GetElementById(_buttonId);
                button.AddOnClickEvent(OnButtonClicked);
            });
        }

        private static void OnButtonClicked()
        {
            if (_dialogScript != null)
            {
                _dialogScript.Close();
                _dialogScript = null;
            }
            else
            {
                var ui = Game.Instance.UserInterface;
                _dialogScript = ui.BuildUserInterfaceFromResource<TutorialDialogScript>(
                    "UI Basics Tutorial/Designer/TutorialDialogUI",
                    (script, controller) => script.OnLayoutRebuilt(controller));
            }
        }
    }
}
namespace Assets.Scripts.Ui.Designer
{
using System;
using System.Collections.Generic;
using System.Linq;
using System.Text;
using System.Threading.Tasks;
using ModApi.Common;
using ModApi.Ui;
using UnityEngine;
public class TutorialDialogScript : MonoBehaviour
{
private IXmlLayoutController _controller;
public void OnLayoutRebuilt(IXmlLayoutController xmlLayoutController)
{
this._controller = xmlLayoutController;
}
public void Close()
{
this._controller.XmlLayout.Hide(() => GameObject.Destroy(this.gameObject), true);
}
private void OnDialogButtonClicked()
{
Game.Instance.Designer.DesignerUi.ShowMessage("Tutorial Dialog Button Clicked", 3f);
}
}
}Save the mod and give it a test. Our designer button should now open and close the custom dialog window. The dialog window should have a button that shows a designer message.
Showing a Message Box Dialog
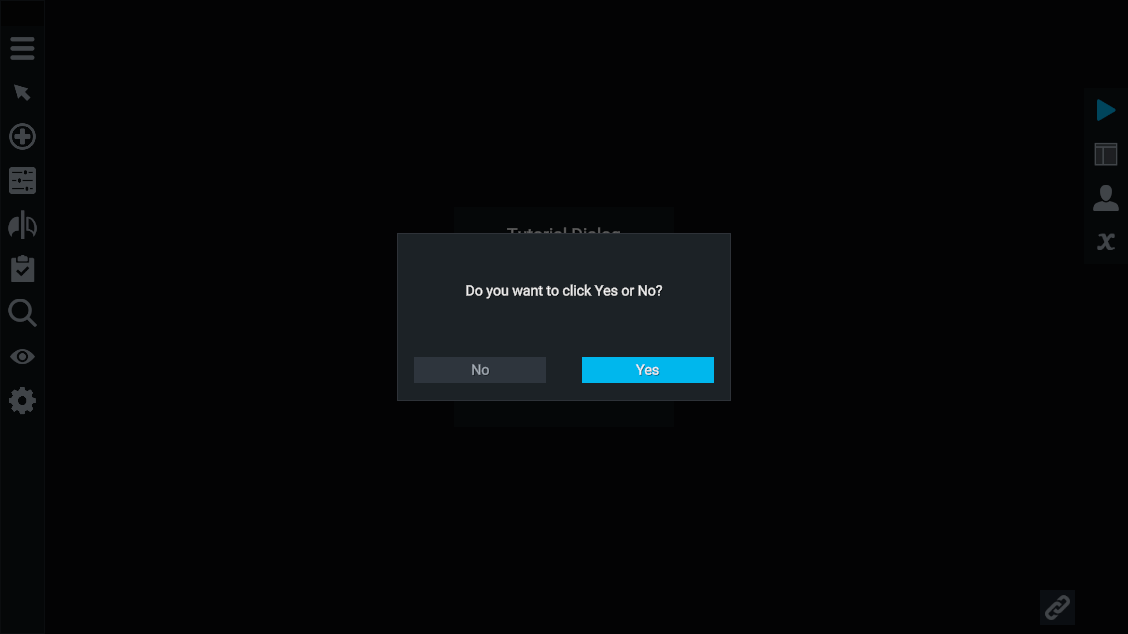
The final thing we are going to demonstrate in this tutorial is creating a message box dialog with a couple options. Head back to our "TutorialDialogScript" and remove the designer message statement we put in there. We can create a message box with the "UserInteface" object we have used previously. We pass "MessageDialogType.OkayCancel" to the "CreateMessageDialog" method to tell it to show the cancel button (in addition to the okay button).
var d = Game.Instance.UserInterface.CreateMessageDialog(MessageDialogType.OkayCancel);A message dialog is returned from the create method. We can use this dialog reference to configure the dialog. Create some custom message and specify the text of the okay/cancel buttons.
d.MessageText = "Do you want to click Yes or No?";
d.OkayButtonText = "Yes";
d.CancelButtonText = "No";
We also need to hook into the click events for each button. We will simply close the dialog and show a designer message with the user's choice.
d.CancelClicked += dialog =>
{
    dialog.Close();
    Game.Instance.Designer.DesignerUi.ShowMessage("User clicked 'No'", 3f);
};
d.OkayClicked += dialog =>
{
    dialog.Close();
    Game.Instance.Designer.DesignerUi.ShowMessage("User clicked 'Yes'", 3f);
};
Our final "TutorialDialogScript" should look like this:
namespace Assets.Scripts.Ui.Designer
{
    using System;
    using System.Collections.Generic;
    using System.Linq;
    using System.Text;
    using System.Threading.Tasks;
    using ModApi.Common;
    using ModApi.Ui;
    using UnityEngine;

    public class TutorialDialogScript : MonoBehaviour
    {
        private IXmlLayoutController _controller;

        public void OnLayoutRebuilt(IXmlLayoutController xmlLayoutController)
        {
            this._controller = xmlLayoutController;
        }

        public void Close()
        {
            this._controller.XmlLayout.Hide(() => GameObject.Destroy(this.gameObject), true);
        }

        private void OnDialogButtonClicked()
        {
            var d = Game.Instance.UserInterface.CreateMessageDialog(MessageDialogType.OkayCancel);
            d.MessageText = "Do you want to click Yes or No?";
            d.OkayButtonText = "Yes";
            d.CancelButtonText = "No";
            d.CancelClicked += dialog =>
            {
                dialog.Close();
                Game.Instance.Designer.DesignerUi.ShowMessage("User clicked 'No'", 3f);
            };
            d.OkayClicked += dialog =>
            {
                dialog.Close();
                Game.Instance.Designer.DesignerUi.ShowMessage("User clicked 'Yes'", 3f);
            };
        }
    }
}
We can now save the mod and test it. Our dialog button should now pop up our message box with our two options, each of which should show a designer message and close the dialog when clicked.
Wrapping up
That should cover the basics of how to work with user interfaces in JNO mod projects. Let me know if you have any questions. The full Unity project for this tutorial can be found here.


Next Tutorial: https://www.simplerockets.com/Forums/View/32308/Mod-Tutorial-Inspector-Panels