
In this mod tutorial, we will cover the basics of creating new rocket engines that plug in to the existing procedural rocket engine system. This tutorial assumes you have completed the Getting Started tutorial and you are familiar with the basics of creating mods in Juno: New Origins. This tutorial was last updated with version 1.0.9 and Unity 2021.3.19f1.
For this tutorial, we will be creating a custom fuel type ("Tutorial Fuel A"), two rocket engines ("Tutorial Engine A" and "Tutorial Engine B"), and one rocket engine nozzle ("Tutorial Nozzle A"). The abominations created in this tutorial are examples only and should not be taken seriously as rocket engines.
Getting Started
First we create a new mod project. We will name this mod "Rocket Engines Tutorial". See the Getting Started tutorial for more info on this. Next, import the Rocket Engines Tutorial Assets unitypackage into the project. This contains the meshes and other assets needed to complete this tutorial. At this point, the mod should be in a state that it can be built and loaded into the game, even though it does nothing yet.
Importing Part Meshes
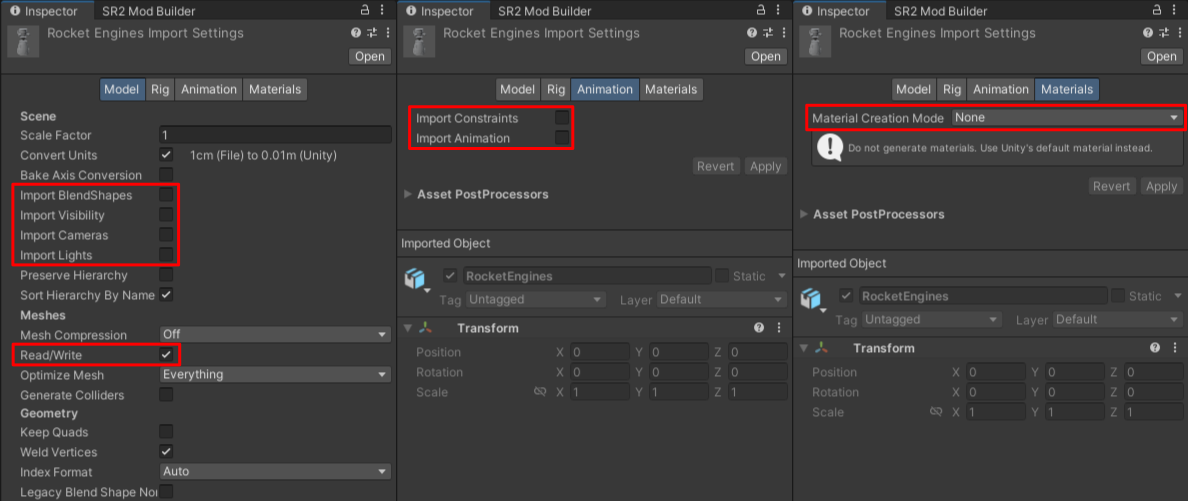
During the setup steps above, we imported the tutorial assets. During this process, a RocketEngines model should have been imported at "/Assets/Content/Craft/Parts/Meshes/RocketEngines.fbx". We should tweak the import settings a bit on this model. Locate and select the model. On the Model tab in the inspector window, we can disable importing of blendshapes, visibility, cameras, and lights. We also need to ensure that the mesh is Read/Write Enabled (should be by default). On the Animation tab, disable the importing of constraints and animations. On the Materials tab, set Material Creation Mode to None. Apply your changes.
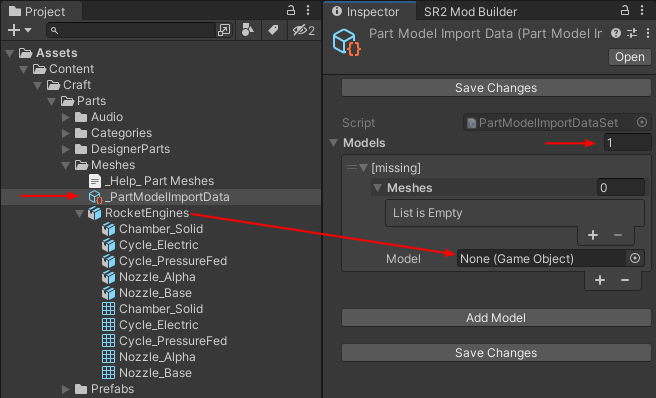
Next, we need to use the _PartModelImportData object to setup the mesh to be imported and used as a part in the game. In the project window, select the _PartModelImportData object at "/Assets/Content/Craft/Parts/Meshes/". In the inspector window, expand Models and set the size to 1. Expand the fields on the new item until you see the Model field. Assign the RocketEngines model to the Model field.
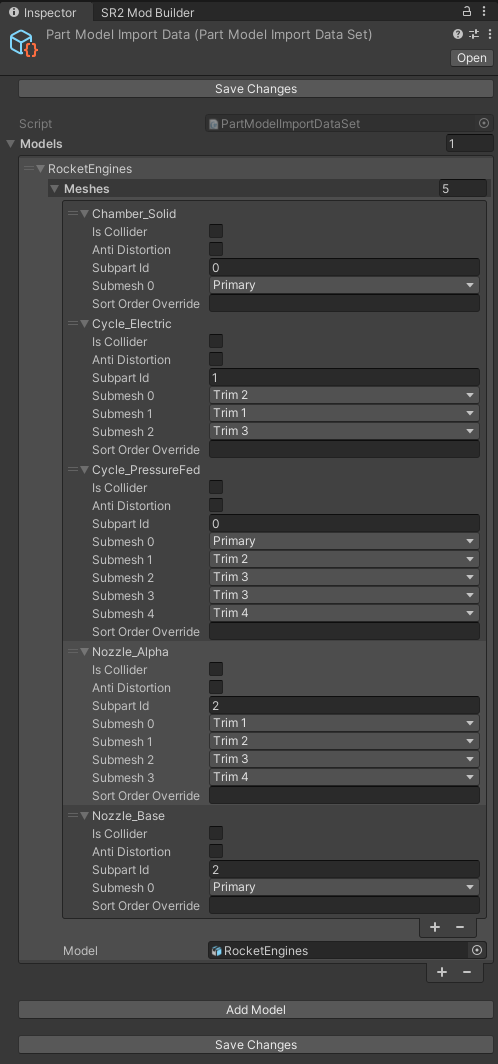
Once the model is assigned, the mesh names for the 5 meshes included in the model should show up in the inspector window. Expand them all. Assign the subpart ids and submesh trim levels as seen the the screenshot below. When done, makes sure you click the Save Changes button at the bottom of the window.
Note: PartModelImportSettings - What do they do?
The part model import data settings are saved to model files and are used during the import process for the model. For the imported model, submeshes will be merged together and the 'w' channel of the first UV set will be overwritten with subpart/material data.

Subpart Ids affect the texturing of parts. They are a way to assign different textures to different meshes within an individual part. All meshes belonging to the same subpart of a part will share the same texture.

Submeshes are used to allow a mesh to be colored with different trim levels in the game. The import data settings allow you to assign each submesh of each part mesh to a specific trim level.
Propulsion.xml
During the mod setup, whenever the "Start Creating Mod" button is clicked on the mod builder window, a bunch of files and folders should be automatically created. Two of these files (both name Propulsion.xml) will play an important roll in the creation of this mod.
/Assets/ModTools/Parts/Propulsion.xml
This file, which we will refer to as the stock Propulsion.xml, is a copy of the Propulsion.xml used by the stock game to load and configure the various rocket engine components and fuel types. It should be used as a reference when creating your own components and fuel types and should never be modified.
/Assets/Content/Craft/Parts/RocketEngines/Propulsion.xml
This file is the mod's Propulsion.xml. Here is where custom fuel types, rocket engines, and nozzles are defined. This file (if it contains any content) will be automatically included in the mod when it is saved and automatically loaded when the mod is loaded in the game. It is linked to a XML schema file that should provide auto-completion and documentation when editing the Propulsion.xml file in applications like Visual Studio.
Creating a Fuel Type
We are going to add a new fuel type to the game called "Tutorial Fuel A". We start off by opening the stock propulsion.xml and copying the Fuel element for "LOX/RP1". Paste this fuel element into the mod's propulsion.xml file as a child of the Fuels element. Change the id to "TutorialFuelA" and the name to "Tutorial Fuel A". Just for the sake of example, we are going to change a few things to unrealistic values. Set the density to "10", the explosivePower to "25000", and the exhaustColor (on the Visual element) to "FF0000FF". We probably also want to change the description to something like "Tutorial Fuel A". At this point, the mod's propulsion.xml should look like the XML below.
<?xml version="1.0" encoding="utf-8"?>
<Propulsion xmlns:xsi="http://www.w3.org/2001/XMLSchema-instance" xsi:noNamespaceSchemaLocation="..\..\..\..\ModTools\Parts\Propulsion.xsd">
  <Fuels>
    <Fuel id="TutorialFuelA" name="Tutorial Fuel A" gamma="1.22" density="10" molecularWeight="21.6" combustionTemperature="3526" price="1.14" explosivePower="25000" description="Tutorial Fuel A">
      <Visual exhaustIntensity="1.0" exhaustDetailIntensity="3.0" exhaustColor="#FF0000FF" smokeIntensity="0.25" />
    </Fuel>
  </Fuels>
  <RocketEngines />
  <RocketNozzles />
  <Grains/>
</Propulsion>
At this point the mod can be saved and loaded into the game. Fuel tanks will show this new fuel option when cycling through fuels, but none of the engines are configured to be able to use this new fuel. Next, we will create two new engines that can use this new fuel type. Later, we will write some code to allow some existing engines to use this fuel type.
Creating a Rocket Engine
We are going to add a new rocket engine type to the game called "Tutorial Rocket A".
Setup the RocketEngine XML
We start off by opening the stock propulsion.xml and copying the RocketEngine element with id "Liquid". Paste this RocketEngine element into the mod's propulsion.xml file as a child of the RocketEngines element. Delete all the SubType elements except for the one with the id of "Electric". Change the SubType's id from "Electric" to "TutorialEngineA" and the name to "Tutorial Engine A".
We want this new rocket engine to use our new fuel type. We can do this by updating the fuels attribute on the RocketEngine element. This attribute specifies the list of fuels that can be used by the engine. These are comma separated values (no spaces) that reference the fuel types by their id. Update the list to include the id of our new fuel, "TutorialFuelA".
The propulsion.xml should now look like the XML below.
<?xml version="1.0" encoding="utf-8"?>
<Propulsion xmlns:xsi="http://www.w3.org/2001/XMLSchema-instance" xsi:noNamespaceSchemaLocation="..\..\..\..\ModTools\Parts\Propulsion.xsd">
  <Fuels>
    <Fuel id="TutorialFuelA" name="Tutorial Fuel A" gamma="1.22" density="10" molecularWeight="21.6" combustionTemperature="3526" price="1.14" explosivePower="25000" description="Tutorial Fuel A">
      <Visual exhaustIntensity="1.0" exhaustDetailIntensity="3.0" exhaustColor="#FF0000FF" smokeIntensity="0.25" />
    </Fuel>
  </Fuels>
  <RocketEngines>
    <RocketEngine id="Liquid" name="Liquid" prefabId="Liquid" fuels="LOX/RP1,LOX/LH2,LOX/CH4,TutorialFuelA" nozzleRadiusScale="0.75" priceScale="2.5" textureStyleIds="RocketEngine_Type" subTextureStyleIds="RocketEngine_SubType">
      <SubType id="TutorialEngineA" name="Tutorial Engine A" subPrefabId="Electric" chamberPressure="2.5" baseMass="10" massScale="3.5" efficiency="0.77" throttleResponse="2" baseScale="0.3" nozzles="Bell,Cone,Delta,Aerospike" radius="1.5" gimbalRange="15" gimbalSpeed="3" basePrice="10000" audio="Small" />
    </RocketEngine>
  </RocketEngines>
  <RocketNozzles />
  <Grains/>
</Propulsion>
Note: RocketEngine vs. SubType
A RocketEngine element can have zero or more subtypes. A RocketEngine with zero subtypes represents a selectable engine in the game. A RocketEngine with one or more subtypes does not represent an engine in the game, but each SubType does. When SubType elements are defined, the parent RocketEngine element can be used to define default values that are shared by all of its subtypes. Each SubType element can override these defaults by redefining XML attributes at the SubType level or they can omit these attributes and take on the default values of the parent RocketEngine element attributes.Setup the Main Prefab
Next, we will set up the main prefab for the engine. This is identified in the XML by the prefabId attribute on the RocketEngine or SubType element. For our current engine, we are using a stock prefab with an id of "Liquid" as specified on the RocketEngine element. Lets add a prefabId attribute to our SubType element with a value of "Tutorial". This will override the value on the RocketEngine element (we could remove it if we want, as it is no longer used).

Referencing prefabs by ids in the propulsion.xml is done via a special naming scheme and using a specific folder. In this case, the prefabId on our rocket engine subtype will look for and load a prefab in the "/Assets/Content/Craft/Parts/RocketEngines/" folder with the name "Chamber_[prefabId]". So the full path for our tutorial rocket's prefab is "/Assets/Content/Craft/Parts/RocketEngines/Chamber_Tutorial.prefab". This prefab doesn't exist yet, so lets create it!
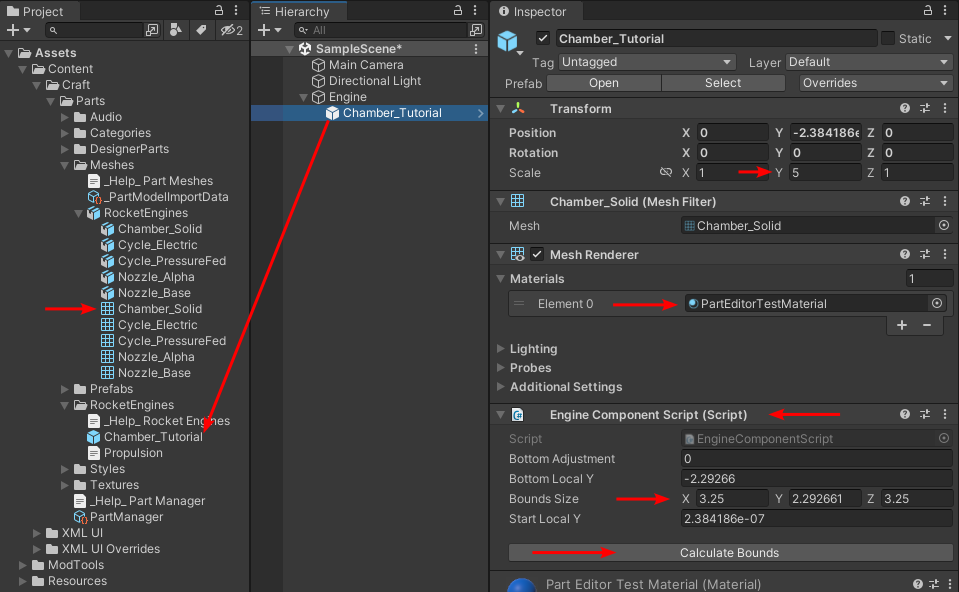
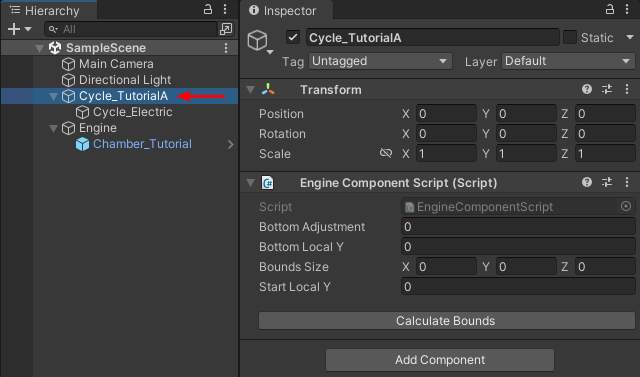
FIrst create an empty game object named "Engine". Create an empty child object named "Chamber_Tutorial". Drag the "Chamber_Solid" mesh to the "Chamber_Tutorial" game object. On the "Chamber_Tutorial" object, set the Y scale to "5", remove the MeshCollider, and assign the "PartEditorTestMaterial" material to the MeshRenderer. Add an "EngineComponentScript" to this object and click the "Calculate Bounds" button on the script. Typically, the auto-generated bounds are fine, but in this case, we need to expand them a bit because the next prefab we create will extend beyond the bounds of the current chamber mesh. Update the X and Z Bounds Size on the EngineComponentScript to both be "3.25". Finally, we create a prefab of this "Chamber_Tutorial" object by dragging it to the "/Assets/Content/Craft/Parts/RocketEngines/" folder.
Note: PartEditorTestMaterial
The PartEditorTestMaterial material is only used in the Unity editor. It is not necessary to assign it to your parts, but it can help visualize the part in the editor as well as help visualize how the part can be painted in game. Feel free to edit the colors of this material, but keep in mind it will be overwritten when updating the mod tools.Setup the Sub Prefab
Next, we will set up the sub prefab for the engine. This is identified in the XML by the subPrefabId attribute on the RocketEngine or SubType element. For our current engine, we are using a stock prefab with an id of "Electric" as specified on the SubType element. Lets change the value of this attribute to "TutorialA". Sub prefabs of rocket engines use the prefix "Cycle", so our engine will try to load a prefab at path "/Assets/Content/Craft/Parts/RocketEngines/Cycle_TutorialA.prefab".

Note: Sub Prefab (Cycle)
Sub prefabs are completely optional. They are specified with the XML attribute "subPrefabId" and use the prefix "Cycle_" when looking for the prefab to load. These are used as a way to add additional unique details to engines while allowing multiple engine to share a common main prefab (specified with "prefabId").Time to create the prefab. Create a new game object named "Cycle_TutorialA" as a sibling (not a child) to the "Engine" game object we created in the previous part, and make sure they are positioned in the same spot. Add an "EngineComponentScript" to this new object. The script is required, but its bounds are not used so there is no need to click the "Calculate Bounds" button like we did previously. Create a child game object called "Cycle_Electric".
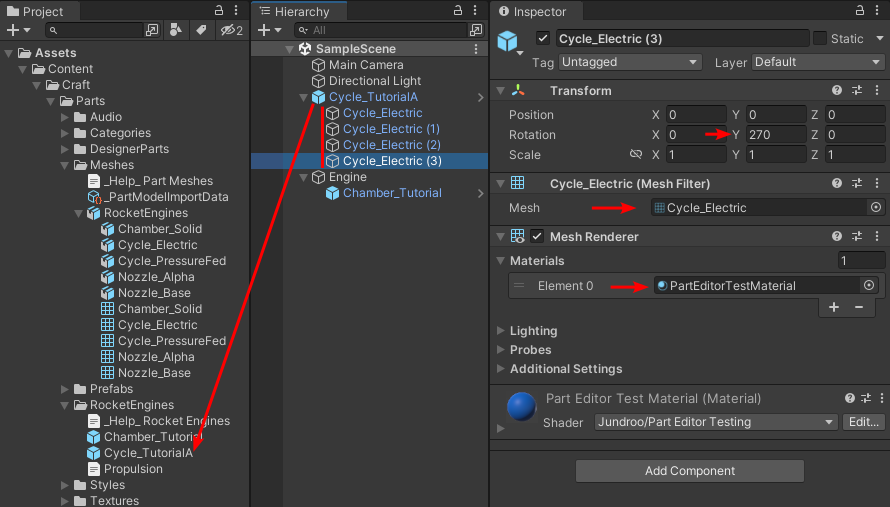
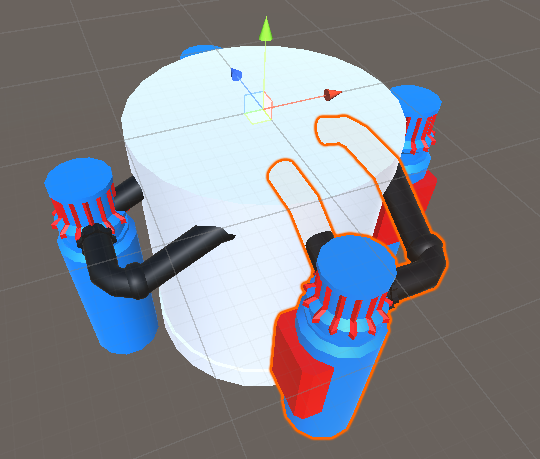
Next, select the "Cycle_Electric" game object that we created. Drag the "Cycle_Electric" Mesh onto the game object and set the MeshRender's material to "PartEditorTestMaterial". Remove the MeshCollider script. Duplicate this game object 3 times (so you have 4 total). Now set the "Y" rotations on the transforms of the new objects to "90", "180", and "270". You should now have something that looks like the screenshot below. Finally, we create a prefab of this "Cycle_TutorialA" object by dragging it to the "/Assets/Content/Craft/Parts/RocketEngines/" folder.
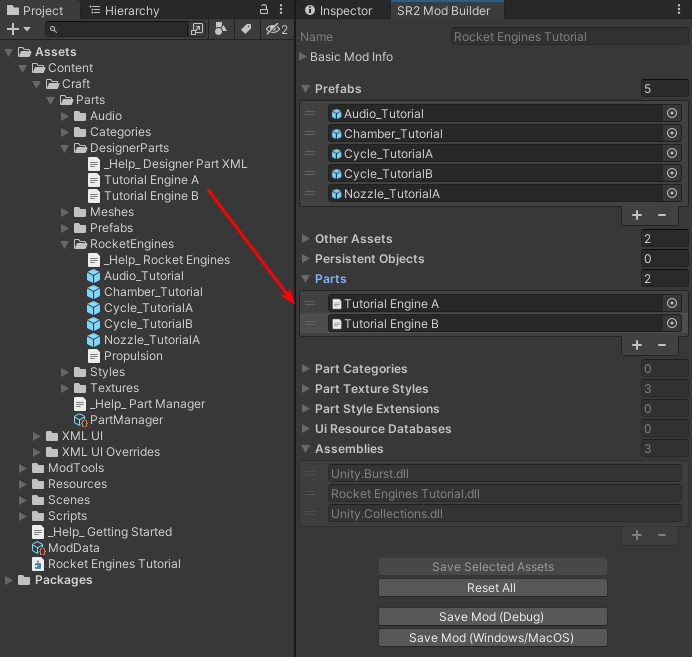
Adding the Prefabs to the Mod
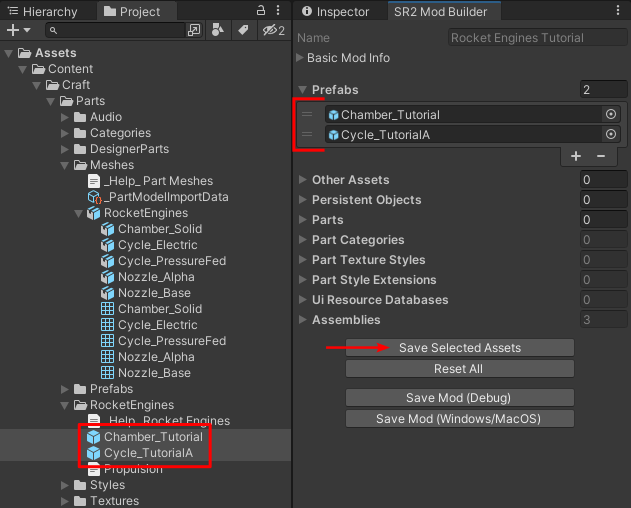
At this point, we are almost ready to test the rocket engine. The last thing we need to do is make sure our two new prefabs are included in the mod. These prefabs need to be added to the prefab list in the "SR2 Mod Builder" window. First, select both prefabs. Next we can either drag and drop them into the Prefab's list or click the "Save Selected Assets" button, both on the mod builder window. The "Prefabs" list should now show our two prefabs we created above.
Testing the Rocket Engine
We should now be ready to test the rocket engine. Save the mod (debug mode is fine for now) and enable it in the game. Go to the designer and select an engine. Cycle through the liquid engine options until you find "Tutorial Engine A". You should also be able to select "Tutorial Fuel A" for its fuel type. There should be no errors in the error log (but the textures may look wrong for right now).

Creating Another Rocket Engine
Now lets create our second rocket engine, "Tutorial Engine B". Duplicate the "TutorialEngineA" subtype in the propulsion XML and change the id to "TutorialEngineB", the name to "Tutorial Engine B", and the subPrefabId to "TutorialB".

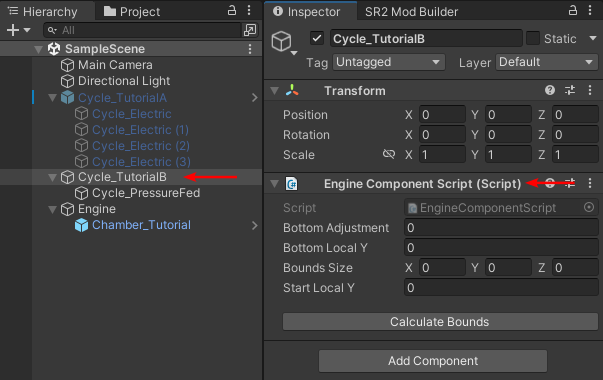
Now we need to create our "TutorialB" sub prefab for the engine. Create an empty game object named "Cycle_TutorialB" as a sibling of our previous "Cycle_TutorialA" game object. Disable the "Cycle_TutorialA" game object and make sure our new object has the same transform position as that object. As we did previously, add the "EngineComponentScript" to the new object but don't do anything with it. Create a child object name "Cycle_PressureFed".
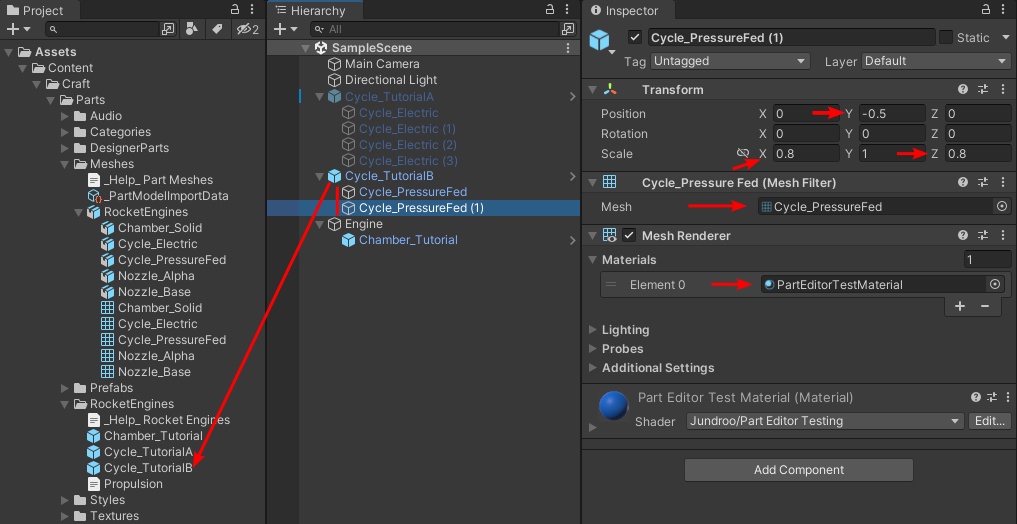
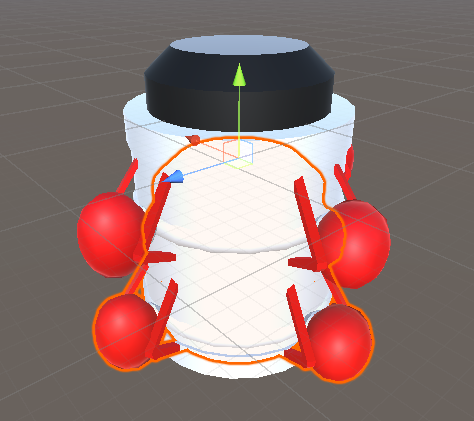
Next, select the "Cycle_PressureFed" game object that we created. Drag the "Cycle_PressureFed" mesh onto the game object and set the MeshRender's material to "PartEditorTestMaterial". Remove the MeshCollider script. Set the transform scale to (0.8, 1.0, 0.8). Duplicate this game object once so that we have two. Set the "Y" transform position of the first one to "0.5" and the second one to "-0.5". You should now have something that looks like the screenshot below. Finally, we create a prefab of this "Cycle_TutorialB" object by dragging it to the "/Assets/Content/Craft/Parts/RocketEngines/" folder.
Finally, add this new prefab to the "Prefabs" list in the "SR2 Mod Builder" window. We can now save our mod and load it into the game again to ensure our new rocket engine is available and working.
Creating a Rocket Engine Nozzle
Our two new rocket engines are currently using existing nozzles. Next we will create a new rocket engine nozzle, "Tutorial Nozzle A" for both of our new engines to use.
Setup the XML
Start of by copying the "Alpha" nozzle from the stock Propulsion.xml file into the mod's Propulsion.xml. Change the id to "TutorialNozzleA" and the name to "Tutorial Nozzle A". We should also add a prefabId attribute with a value of "TutorialA" to this RocketNozzle element. Finally, we need to update our "TutorialEngineA" and "TutorialEngineB" rocket engines to use this new nozzle. Find the nozzles attribute on the SubType element for each engine. This attribute contains the comma separated (no spaces) list of nozzle ids that are supported for the engine. Add our "TutorialNozzleA" nozzle to both comma separated lists. Our XML should now look like the XML below.
<?xml version="1.0" encoding="utf-8"?>
<Propulsion xmlns:xsi="http://www.w3.org/2001/XMLSchema-instance" xsi:noNamespaceSchemaLocation="..\..\..\..\ModTools\Parts\Propulsion.xsd">
  <Fuels>
    <Fuel id="TutorialFuelA" name="Tutorial Fuel A" gamma="1.22" density="10" molecularWeight="21.6" combustionTemperature="3526" price="1.14" explosivePower="25000" description="Tutorial Fuel A">
      <Visual exhaustIntensity="1.0" exhaustDetailIntensity="3.0" exhaustColor="#FF0000FF" smokeIntensity="0.25" />
    </Fuel>
  </Fuels>
  <RocketEngines>
    <RocketEngine id="Liquid" name="Liquid" prefabId="Liquid" fuels="LOX/RP1,LOX/LH2,LOX/CH4,TutorialFuelA" nozzleRadiusScale="0.75" priceScale="2.5" textureStyleIds="RocketEngine_Type" subTextureStyleIds="RocketEngine_SubType">
      <SubType id="TutorialEngineA" name="Tutorial Engine A" prefabId="Tutorial" subPrefabId="TutorialA" chamberPressure="2.5" baseMass="10" massScale="3.5" efficiency="0.77" throttleResponse="2" baseScale="0.3" nozzles="Bell,Cone,Delta,Aerospike,TutorialNozzleA" radius="1.5" gimbalRange="15" gimbalSpeed="3" basePrice="10000" audio="Small" />
      <SubType id="TutorialEngineB" name="Tutorial Engine B" prefabId="Tutorial" subPrefabId="TutorialB" chamberPressure="2.5" baseMass="10" massScale="3.5" efficiency="0.77" throttleResponse="2" baseScale="0.3" nozzles="Bell,Cone,Delta,Aerospike,TutorialNozzleA" radius="1.5" gimbalRange="15" gimbalSpeed="3" basePrice="10000" audio="Small" />
    </RocketEngine>
  </RocketEngines>
  <RocketNozzles>
    <RocketNozzle id="TutorialNozzleA" name="Tutorial Nozzle A" prefabId="TutorialA" throatRadius="0.50" nozzleRadius="1.85" nozzleLength="3.813335" textureStyleIds="RocketEngine_Nozzle" />
  </RocketNozzles>
  <Grains/>
</Propulsion>
Note: Nozzle Extensions
Some nozzles in the stock game use extension prefabs. These allow the nozzle to be resized in the part properties menu in the in-game designer. They require the nozzle meshes be created a specific way and are more complicated to configure and get working correctly. This tutorial will not cover rocket nozzle extensions.Create the Nozzle Prefab
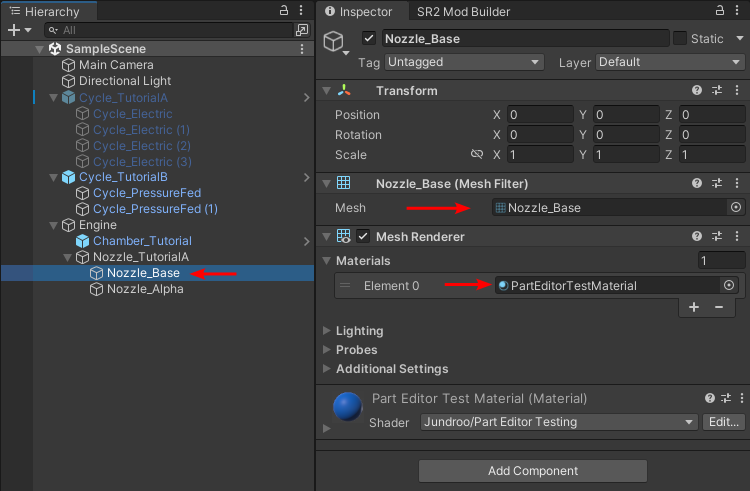
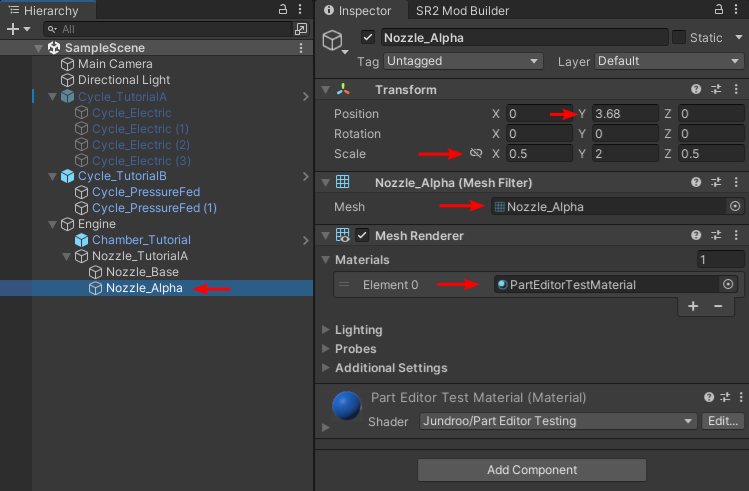
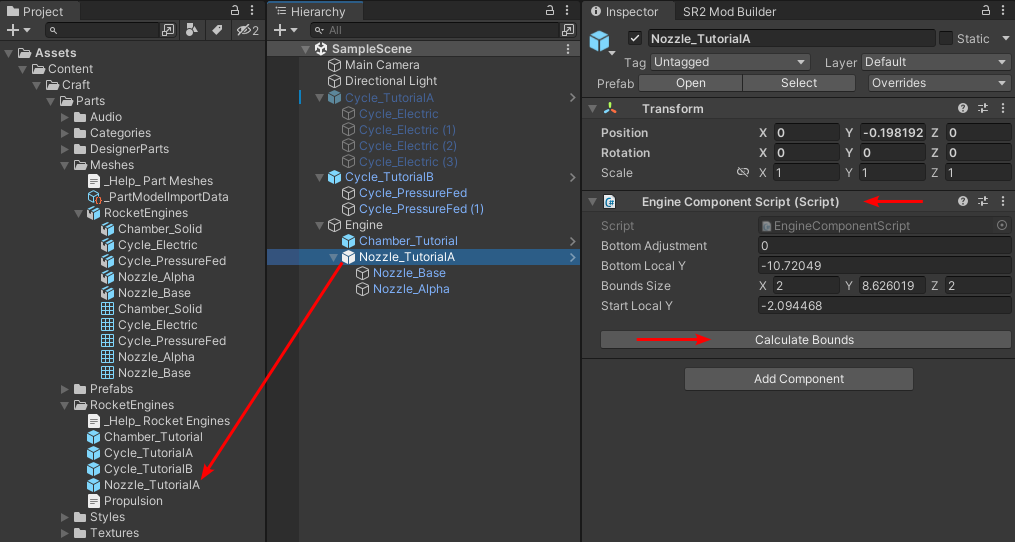
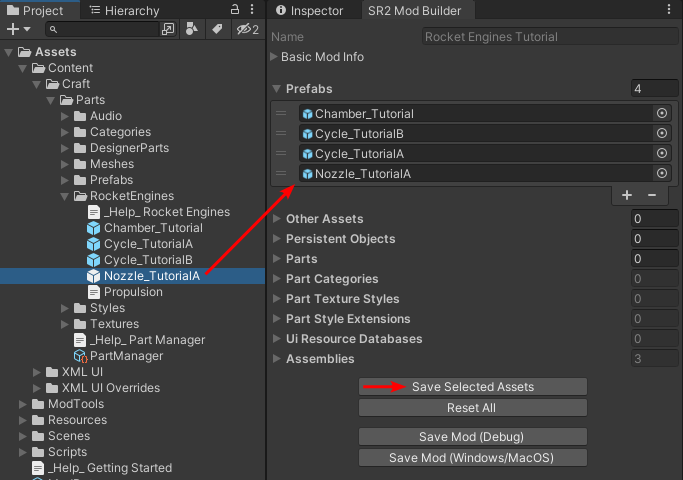
Next, we need to create our prefab for the new rocket nozzle. Create an empty game object named "Nozzle_TutorialA" as a child under our "Engine" game object we created earlier. There should be only two child elements here, the first being the "Chamber_Tutorial" and the second being our new "Nozzle_TutorialA". Create a "Nozzle_Base" and a "Nozzle_Alpha" game object under the "Nozzle_TutorialA" object. Add the "Nozzle_Base" and "Nozzle_Alpha" meshes to the game objects with the same name. On each, remove the MeshColliders and set the "PartEditorTestMaterial" material on the MeshRenderers. For the "Nozzle_Alpha" game object, set the "Y" position of the transform to "3.68" and the scale to (0.5, 2.0, 0.5). On the "Nozzle_TutorialA" game object, add the EngineComponentScript and click the "Calculate Bounds" button. Finally, we create a prefab of this "Nozzle_TutorialA" object by dragging it to the "/Assets/Content/Craft/Parts/RocketEngines/" folder. After creating the prefab, add it to the Prefab's list in the mod builder window.
Testing the Nozzle
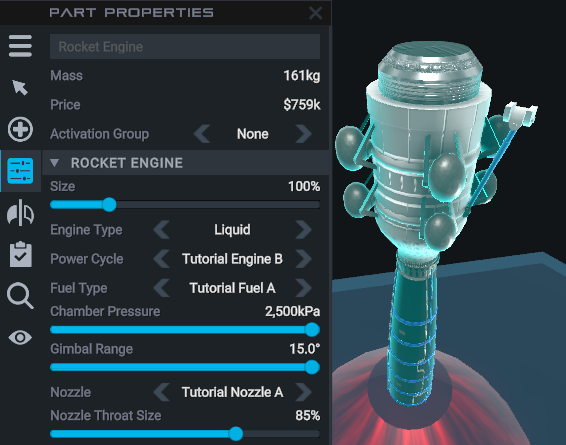
We should now be able to save the mod, load it in the game, and be able to select our new nozzle for our two new rocket engines.
Texturing
The current texturing for the engines may look fine, but that is because it is using stock textures that were designed for the mesh files that we are using. We are now going to wire up custom textures for our new rocket parts. Since your tutorial maker is terrible at texturing, we will be using example textures that demonstrate the concept, but look awful.
At the beginning when we imported the mod assets unity package, there should have been 6 textures imported into the project:
\Assets\Content\Craft\Parts\Textures\Detail\Bricks_Detail.png
\Assets\Content\Craft\Parts\Textures\Detail\Diamonds_Detail.png
\Assets\Content\Craft\Parts\Textures\Detail\ZigZags_Detail.png
\Assets\Content\Craft\Parts\Textures\Normal\Bricks_Normal.png
\Assets\Content\Craft\Parts\Textures\Normal\Diamonds_Normal.png
\Assets\Content\Craft\Parts\Textures\Normal\ZigZags_Normal.png
On our RocketEngine element of our Propulsion.xml, there are two attributes that affect the texturing, textureStyleIds and subTextureStyleIds. These attributes can also be defined on the SubType element if not all sub types will be sharing the same textures. Likewise, the RocketNozzle element also has textureStyleIds and a extensionTextureStyleIds attributes. All 4 of these attributes are comma separated lists (no spaces) of texture style IDs for texture styles that are supported by that part & sub-part. The RocketEngine's textureStyleIds corresponds to sub-part 0 and subTextureStyleIds is for sub-part 1. Likewise for RocketNozzle, textureStyleIds defines textures for sub-part 2 and extensionTextureStyleIds is for sub-part 3.
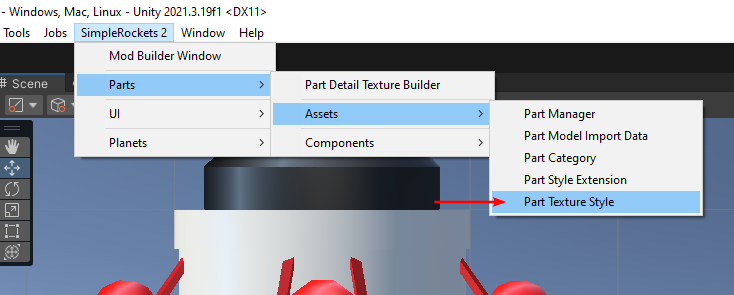
First, we need to create some texture styles. A texture style is a combination of a detail texture and normal map texture (both optional), along with some configuration data. We create a new texture style by going to the SimpleRockets 2 menu bar item, selecting Parts and then Assets, and finally selecting Part Texture Style.
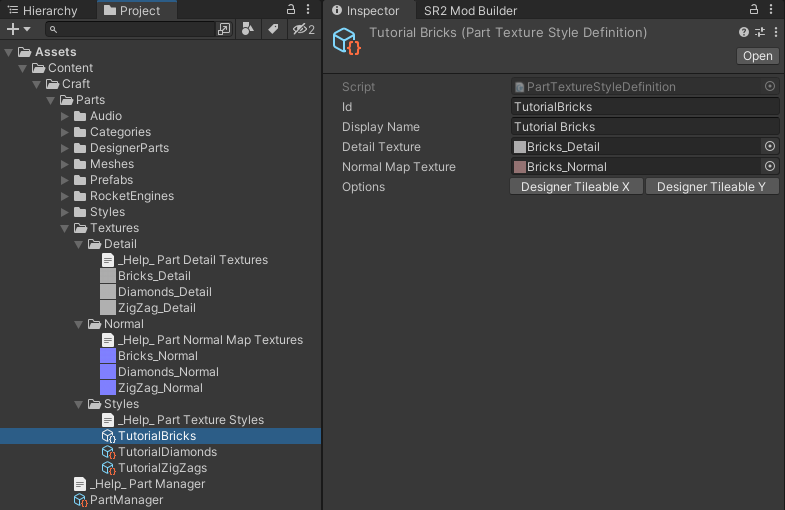
Rename the new texture style to "TutorialBricks". Update the Id to "TutorialBricks" and the Display Name to "Tutorial Bricks". Assign the "Bricks_Detail" texture to the Detail Texture field and the "Bricks_Normal" to the Normal Map Texture field. Repeat this process for the diamonds and zigzags texture, using ids of "TutorialDiamonds" and "TutorialZigZags".
Now that we have our texture styles, lets wire them up to the rocket engines and nozzles. In our Propulsion.xml, set the textureStyleIds attribute of our RocketEngine element to "TutorialBricks,TutorialDiamonds,TutorialZigZags". This means that both rocket engines will have all three texture options for meshes set to be part of sub-part 0 with the first, "TutorialBricks", being the default texture. For the subTextureStyleIds attribute, use value "TutorialDiamonds,TutorialZigZags,TutorialBricks". Finally, for the RocketNozzle's textureStyleIds, use "TutorialZigZags,TutorialBricks,TutorialDiamonds".
<?xml version="1.0" encoding="utf-8"?>
<Propulsion xmlns:xsi="http://www.w3.org/2001/XMLSchema-instance" xsi:noNamespaceSchemaLocation="..\..\..\..\ModTools\Parts\Propulsion.xsd">
<Fuels>
<Fuel id="TutorialFuelA" name="Tutorial Fuel A" gamma="1.22" density="10" molecularWeight="21.6" combustionTemperature="3526" price="1.14" explosivePower="25000" description="Tutorial Fuel A">
<Visual exhaustIntensity="1.0" exhaustDetailIntensity="3.0" exhaustColor="#FF0000FF" smokeIntensity="0.25" />
</Fuel>
</Fuels>
<RocketEngines>
<RocketEngine id="Liquid" name="Liquid" prefabId="Liquid" fuels="LOX/RP1,LOX/LH2,LOX/CH4,TutorialFuelA" nozzleRadiusScale="0.75" priceScale="2.5" textureStyleIds="TutorialBricks,TutorialDiamonds,TutorialZigZags" subTextureStyleIds="TutorialDiamonds,TutorialZigZags,TutorialBricks">
<SubType id="TutorialEngineA" name="Tutorial Engine A" prefabId="Tutorial" subPrefabId="TutorialA" chamberPressure="2.5" baseMass="10" massScale="3.5" efficiency="0.77" throttleResponse="2" baseScale="0.3" nozzles="Bell,Cone,Delta,Aerospike,TutorialNozzleA" radius="1.5" gimbalRange="15" gimbalSpeed="3" basePrice="10000" audio="Small" />
<SubType id="TutorialEngineB" name="Tutorial Engine B" prefabId="Tutorial" subPrefabId="TutorialB" chamberPressure="2.5" baseMass="10" massScale="3.5" efficiency="0.77" throttleResponse="2" baseScale="0.3" nozzles="Bell,Cone,Delta,Aerospike,TutorialNozzleA" radius="1.5" gimbalRange="15" gimbalSpeed="3" basePrice="10000" audio="Small" />
</RocketEngine>
</RocketEngines>
<RocketNozzles>
<RocketNozzle id="TutorialNozzleA" name="Tutorial Nozzle A" prefabId="TutorialA" throatRadius="0.50" nozzleRadius="1.85" nozzleLength="3.813335" textureStyleIds="TutorialZigZags,TutorialBricks,TutorialDiamonds" />
</RocketNozzles>
<Grains/>
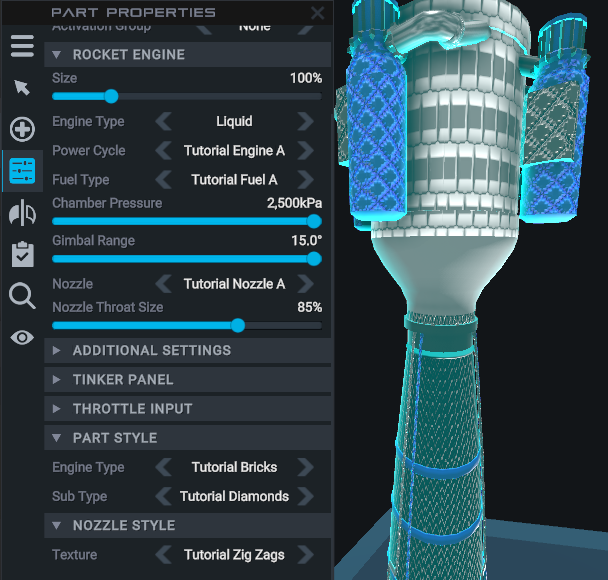
</Propulsion>Now we should be able to save the mod, load it up in game, and see the 3 different texture options, each containing our 3 different textures for use with our new rocket engines and nozzle. Its not pretty, but it should work...
Rocket Engine Audio
Our rocket engines are still using stock audio files. We can customize this as well. First lets update our Propulsion.xml file. Each Rocket Engine element has an audio attribute. Lets give both of these a value of "Tutorial". This means that it will try to load a prefab from our mod's RocketEngines folder with a name of "Audio_Tutorial". Next, we need to create this prefab.

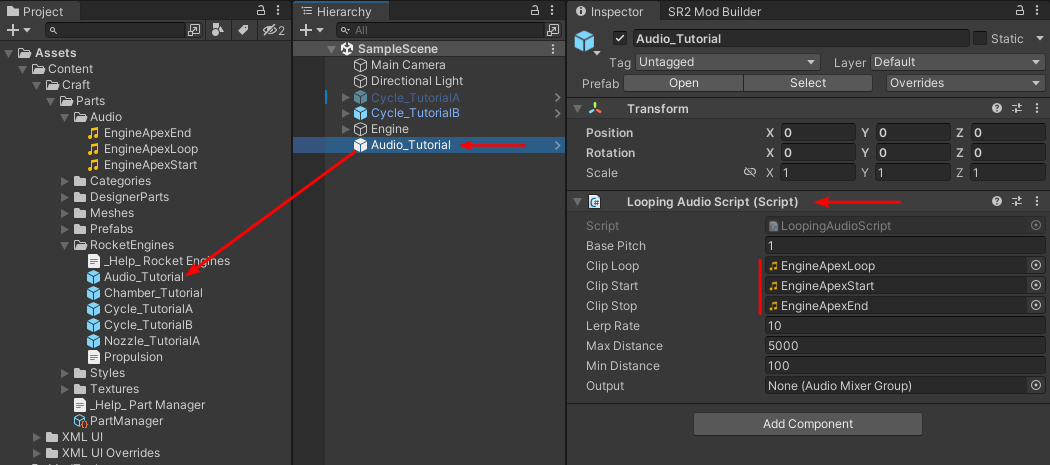
Create a game object named "Audio_Tutorial". Add a "LoopingAudioScript" component to the game object. We should have 3 audio clips in our project from when we imported the tutorial assets. They should be located here: \Assets\Content\Craft\Parts\Audio. Assign these audio clips to the LoopingAudioScript component. Drag the "Audio_Tutorial" game object to the "\Assets\Content\Craft\Parts\RocketEngines\" folder to create a prefab. Finally, add the newly created prefab to the list of prefabs in the mod builder window.
The new audio should now be working. Feel free to build the mod and give it a test.
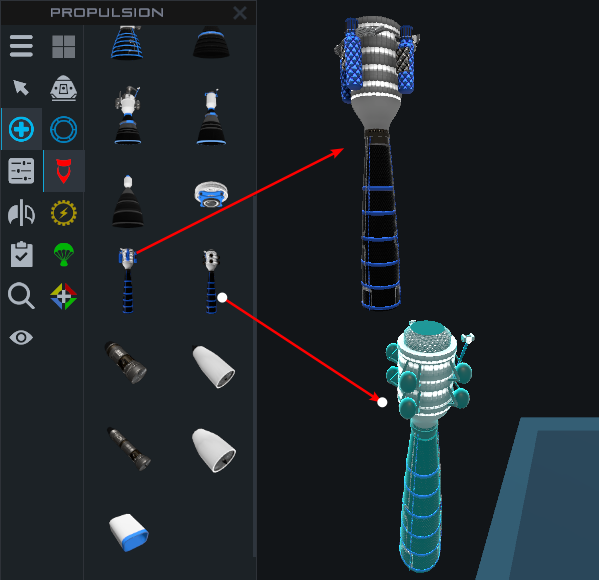
Creating Designer Parts
Our rocket engines and nozzle are selectable via part properties on all the other engines, but we don't have a pre-made engine to pull out from the part list that uses our new components by default. Lets set that up now.
The easiest way to accomplish this is by creating sub-assemblies of our engines. Load up the designer and create two engines using our new rocket engine and nozzle components. Create a sub-assembly out of both of these engines. Now, close the game and find the XML for the generated sub-assemblies. It should be located here: C:\Users[Your User Name]\AppData\LocalLow\Jundroo\SimpleRockets 2\UserData\Subassemblies. Copy these XML files to your mod project here: \Assets\Content\Craft\Parts\DesignerParts.
Now that the XML is in your project, lets make a few manual tweaks. For each file, open up the XML and find the DesignerPart element. Change the name to something appropriate and give it a good description. Lets change the category to "Propulsion" so that they show up in the Propulsion category in the designer. Finally, you may also want to tweak the order so that they show up near the bottom of the Propulsion category list.
<?xml version="1.0" encoding="utf-8"?>
<DesignerParts>
  <DesignerPart name="Tutorial Engine A" category="Propulsion" description="A tutorial engine (A)" order="200" showInDesigner="true">
    <Assembly xmlVersion="14">
      <Parts>
        <Part id="5" partType="RocketEngine1" position="0,0,0" rotation="0,0,0" name="Mage Engine" activationStage="0" materials="0,1,2,3,4" engineTypeTexture="TutorialBricks" subTypeTexture="TutorialDiamonds" nozzleTexture="TutorialZigZags">
          <Drag drag="1.722646,1.686491,0,0.5980573,1.964166,1.960201" area="2.332167,2.332167,0,1.250366,2.671641,2.671641" />
          <Config heatShieldScale="0" />
          <RocketEngine engineSubTypeId="TutorialEngineA" wattsPerFuelFlowOverride="-1" heatTransferOverride="1" fuelType="TutorialFuelA" mass="1.6062634" nozzleThroatSize="0.85" nozzleTypeId="TutorialNozzleA" price="758572" />
          <InputController inputId="Throttle" />
        </Part>
      </Parts>
      <Connections />
      <Collisions />
      <Bodies />
    </Assembly>
  </DesignerPart>
</DesignerParts>
<?xml version="1.0" encoding="utf-8"?>
<DesignerParts>
<DesignerPart name="Tutorial Engine B" category="Propulsion" description="A tutorial engine (B)" order="201" showInDesigner="true">
<Assembly xmlVersion="14">
<Parts>
<Part id="5" partType="RocketEngine1" position="0,0,0" rotation="0,0,0" name="Mage Engine" activationStage="0" materials="0,1,2,3,4" engineTypeTexture="TutorialBricks" subTypeTexture="TutorialDiamonds" nozzleTexture="TutorialZigZags">
<Drag drag="1.722646,1.686491,0,0.5980573,1.964166,1.960201" area="2.332167,2.332167,0,1.250366,2.671641,2.671641" />
<Config heatShieldScale="0" />
<RocketEngine engineSubTypeId="TutorialEngineB" wattsPerFuelFlowOverride="-1" heatTransferOverride="1" fuelType="TutorialFuelA" mass="1.6062634" nozzleThroatSize="0.85" nozzleTypeId="TutorialNozzleA" price="758572" />
<InputController inputId="Throttle" />
</Part>
</Parts>
<Connections />
<Collisions />
<Bodies />
</Assembly>
</DesignerPart>
</DesignerParts>Finally, we need to add our part XML to the "Parts" list of the mod builder window. Now we can save the mod, load it up in the game, and see our new parts in the part list.
Extending Stock Engines
We have created a new fuel and a new nozzle, but they only work for our two custom rocket engines. Now lets try to add them to the other stock rocket engines. To do this, we will need to write a bit of code.
Open up the "Mod.cs" script under Assets/Scripts. Override the OnModLoaded method.
public override void OnModLoaded()
{
    base.OnModLoaded();
}
Grab the loaded propulsion data and find our custom fuel and nozzle.
var data = Game.Instance.PropulsionData;
var tutorialFuelA = data.Fuels.First(x => x.Id == "TutorialFuelA");
var tutorialNozzleA = data.RocketNozzles.First(x => x.Id == "TutorialNozzleA");
Now find the liquid engines. We can loop over all sub types, excluding those from mods, and add our fuel to the supported fuels and the nozzle to the supported nozzles.
var liquidEngines = data.RocketEngines.First(x => x.Id == "Liquid");
foreach (var engine in liquidEngines.SubTypes.Where(x => x.Mod == null))
{
    engine.SupportedFuels.Add(tutorialFuelA);
    engine.SupportedNozzles.Add(tutorialNozzleA);
}
That should be all that is necessary to allow our custom fuel and nozzle to be selectable with all the stock liquid rocket engines. Save the mod and test it out. The full content of the "Mod.cs" file is below.
namespace Assets.Scripts
{
    using System;
    using System.Collections.Generic;
    using System.Linq;
    using System.Text;
    using ModApi;
    using ModApi.Common;
    using ModApi.Mods;
    using UnityEngine;

    /// <summary>
    /// A singleton object representing this mod that is instantiated and initialize when the mod is loaded.
    /// </summary>
    public class Mod : ModApi.Mods.GameMod
    {
        /// <summary>
        /// Prevents a default instance of the <see cref="Mod"/> class from being created.
        /// </summary>
        private Mod() : base()
        {
        }

        /// <summary>
        /// Gets the singleton instance of the mod object.
        /// </summary>
        /// <value>The singleton instance of the mod object.</value>
        public static Mod Instance { get; } = GetModInstance<Mod>();

        /// <summary>
        /// Called when the mod is fully loaded.
        /// This occurs after the mod is initialized and after mod data is loaded (like part and propulsion data, UI resources, etc.)
        /// </summary>
        public override void OnModLoaded()
        {
            base.OnModLoaded();

            var data = Game.Instance.PropulsionData;
            var tutorialFuelA = data.Fuels.First(x => x.Id == "TutorialFuelA");
            var tutorialNozzleA = data.RocketNozzles.First(x => x.Id == "TutorialNozzleA");

            var liquidEngines = data.RocketEngines.First(x => x.Id == "Liquid");
            foreach (var engine in liquidEngines.SubTypes.Where(x => x.Mod == null))
            {
                engine.SupportedFuels.Add(tutorialFuelA);
                engine.SupportedNozzles.Add(tutorialNozzleA);
            }
        }
    }
}
Wrapping up
That should cover the basics of how to use the procedural rocket engine system to create custom fuels, engines, and nozzles. Let me know if you have any questions. The full Unity project for this tutorial can be found here.


would it be possible to create a reactionless drive?